[스프링 부트/MVC] 정적 리소스(Static Resources) 기본 설정과 커스텀 방법

[스프링 부트/MVC] 정적 리소스(Static Resources) 기본 설정과 커스텀 방법
스프링 부트는 정적 리소스(static resources)에 대한 기본 매핑 설정과 커스텀을 지원한다.
실제로 확인해보자.
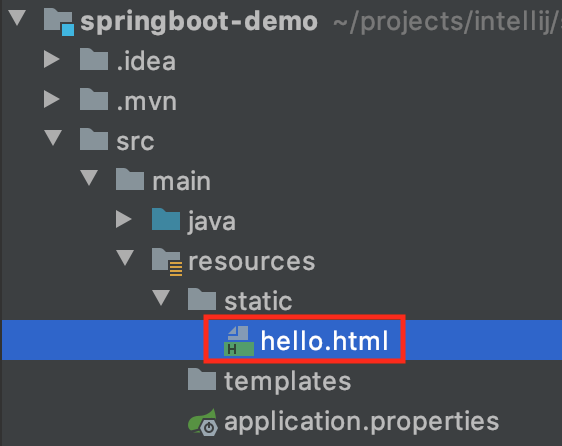
스프링 부트 프로젝트의 src/main/resources/static/에 hello.html을 새로 만든다.
<!DOCTYPE html>
<html lang="en">
<head>
    <meta charset="UTF-8">
    <title>Title</title>
</head>
<body>
Hello Static Resource
</body>
</html>
정적 리소스는 어플리케이션을 재기동하지 않고 빌드하는 것 만으로 변경사항을 확인할 수 있다.
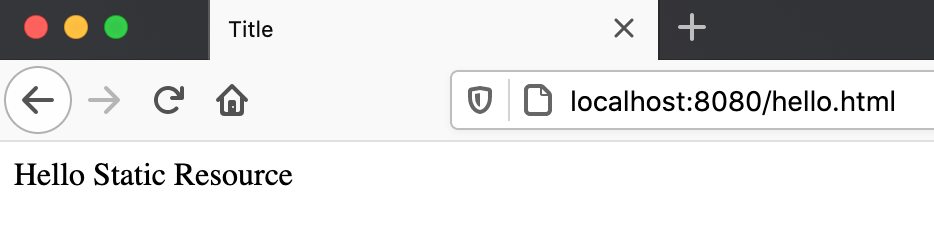
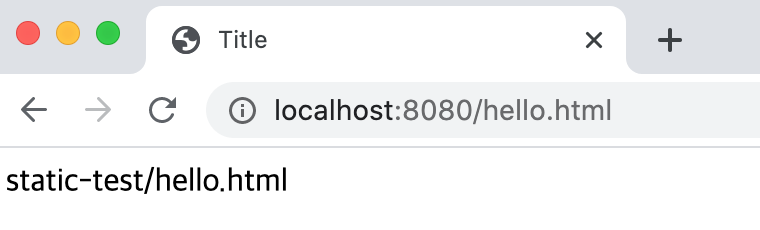
프로젝트 빌드 후 http://localhost:8080/hello.html로 요청해보자.
정적 리소스 매핑 URL 패턴
기본적으로 /**(루트) 부터 매핑된다.
따라서 위 예처럼 http://127.0.0.1:8080/hello.html을 요청하면 정적 리소스 location(위치)에서 찾아 응답한다.
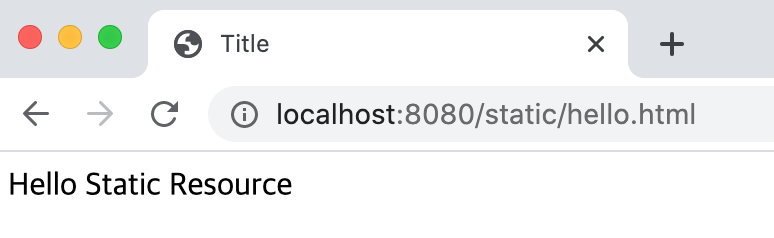
정적 리소스 매핑 패턴을 루트가 아닌 다른 패턴으로 바꿔보자.
정적 리소스 매핑 패턴 변경 - spring.mvc.static-path-pattern
application.properties
spring.mvc.static-path-pattern=/static/**
참고로 이 프로퍼티는 WebMvcProperties에 구현되어 있다.
정적 리소스 Location(위치)
정적 리소스 location이란 서버가 정적 리소스를 찾을 디렉토리를 의미한다.
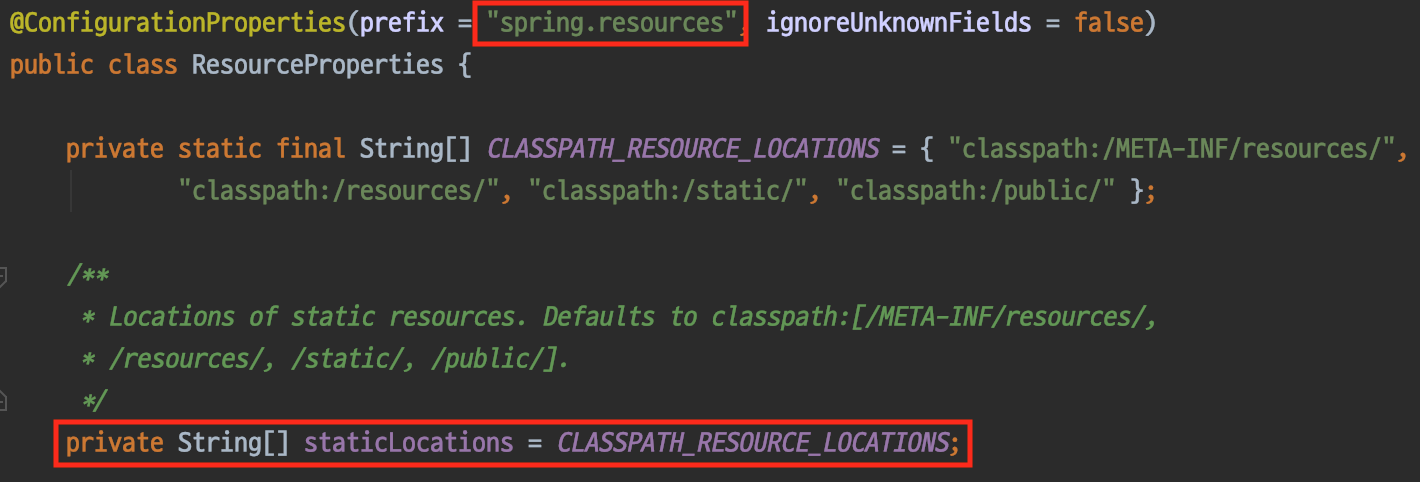
스프링 부트의 기본 정적 리소스 위치는 다음과 같다.
이는 ResourceProperties에 정의되어 있으며, 스프링 부트 1.5.3.RELEASE 부터 현재 기준 가장 최신 버전인 2.3.3.RELEASE 까지 동일하다.
- classpath:/META-INF/resources/
- classpath:/resources/
- "classpath:/static/"
- "classpath:/public/"
정적 리소스 location을 바꿔보자.
정적 리소스 location 변경 - spring.resources.static-locations
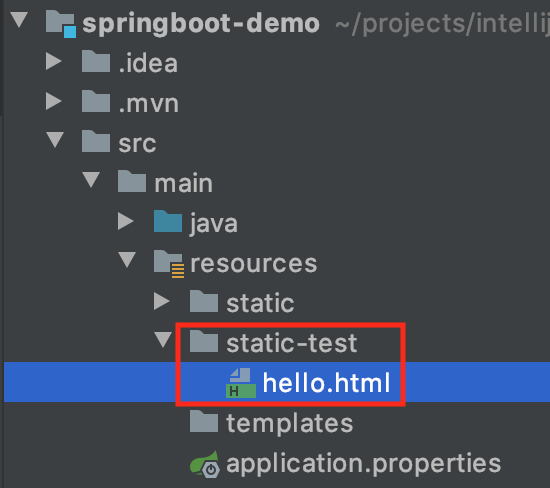
정적 리소스 location을 /static-test/으로 변경해볼 것이다.
프로젝트 src/main/resources/에 static-test 디렉토리를 생성하고 hello.html을 위치시킨다.
<!DOCTYPE html>
<html lang="en">
<head>
    <meta charset="UTF-8">
    <title>Title</title>
</head>
<body>
static-test/hello.html
</body>
</html>
application.properties에 spring.resources.static-locations을 이용하여 위에서 만든 디렉토리를 설정한다.
spring.resources.static-locations=classpath:/static-test/
어플리케이션을 재기동하고 http://localhost:8080/hello.html로 요청한다.
spring.resources.static-locations 프로퍼티는 ResourceProperties에 정의되어 있다.
이 spring.resources.static-locations 프로퍼티를 통해 location을 설정하는 방법은 스프링 부트에서 기본으로 제공하는 locations를 override하기 때문에 설정 후에는 기본 location을 사용할 수 없다. 따라서 다음의 WebConfigurer를 통한 커스터마이징을 주로 사용한다.
정적 리소스 설정 커스터마이징 - WebConfigurer
WebMvcConfigurer를 구현하는 클래스에서 addResourceHandlers를 override하여 정적 리소스 핸들러를 커스터마이징할 수 있다.
이 방법을 사용하면 스프링 부트가 제공하는 정적 리소스 핸들러는 그대로 사용하면서 커스텀 핸들러가 추가된다.
@Configuration
public class WebConfig implements WebMvcConfigurer {
@Override
public void addResourceHandlers(ResourceHandlerRegistry registry) {
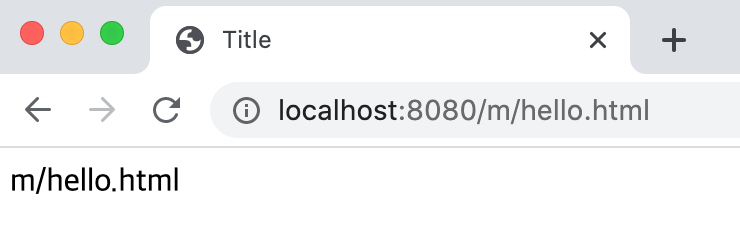
registry.addResourceHandler("/m/**")
.addResourceLocations("classpath:/m/")
.setCachePeriod(20)
;
}
}/m/** 패턴 요청 시 classpath의 /m/ 디렉토리에서 정적 리소스를 찾아 응답하도록 하는 설정이다.
setCachePeriod를 통해 캐싱 전략을 설정해주어야 한다. (초 단위)
설정한 핸들러에 대해 테스트하기 위해 src/main/resources에 m 디렉토리를 만들고 hello.html을 위치시킨다.

<!DOCTYPE html>
<html lang="en">
<head>
    <meta charset="UTF-8">
    <title>Title</title>
</head>
<body>
m/hello.html
</body>
</html>
ResourceHttpRequestHandler
정적 리소스에 대한 요청의 응답은 ResourceHttpRequestHandler가 처리한다.
브라우저에서 이전과 동일한 리소스를 다시 요청해보자.
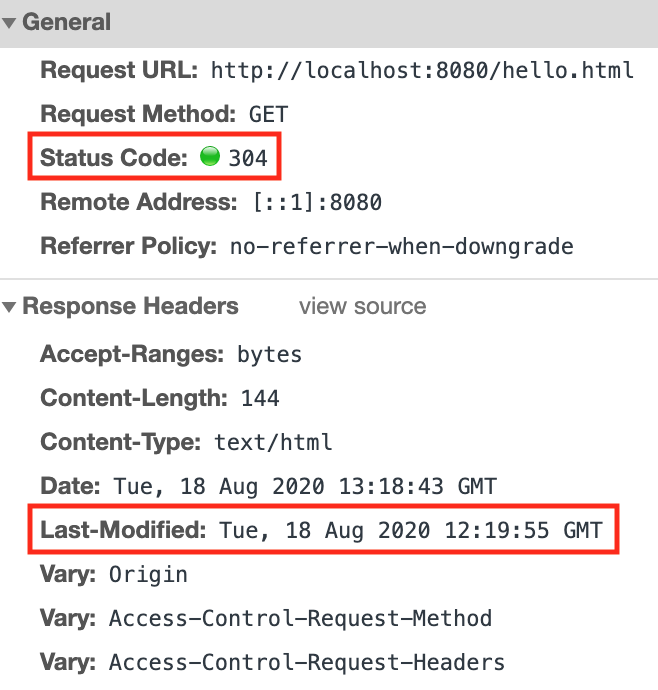
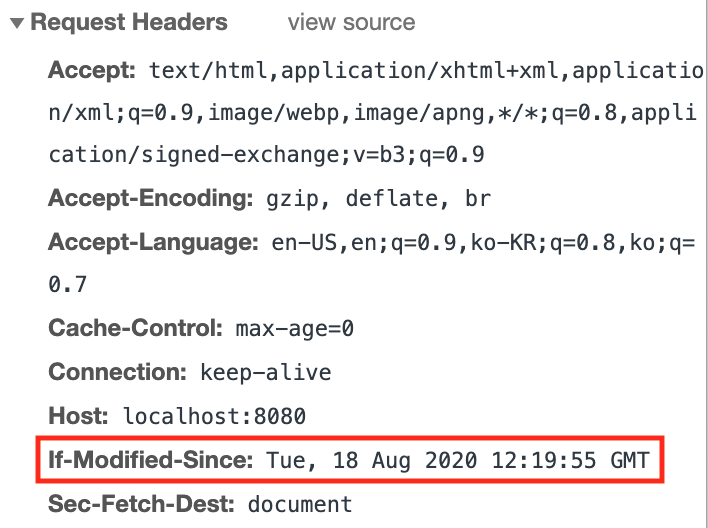
크롬 브라우저에서 테스트를 해보면 요청 헤더에 If-Modified-Since가 보내지고 응답 헤더에 Last-Modified, 응답 코드로 304를 받는 것을 알 수 있다.
304 응답 코드는 hello.html을 서버에서 받아오는게 아니라 브라우저에서 캐싱하고 있던 데이터를 보여준다.
다시 hello.html을 수정하고 프로젝트를 빌드한 뒤 테스트해보자.
이로 인해 hello.html의 modified date가 현재 시각으로 갱신되고 http://127.0.0.1:8080/hello.html 재요청 시 HTTP 메시지가 다음과 같이 바뀐다.
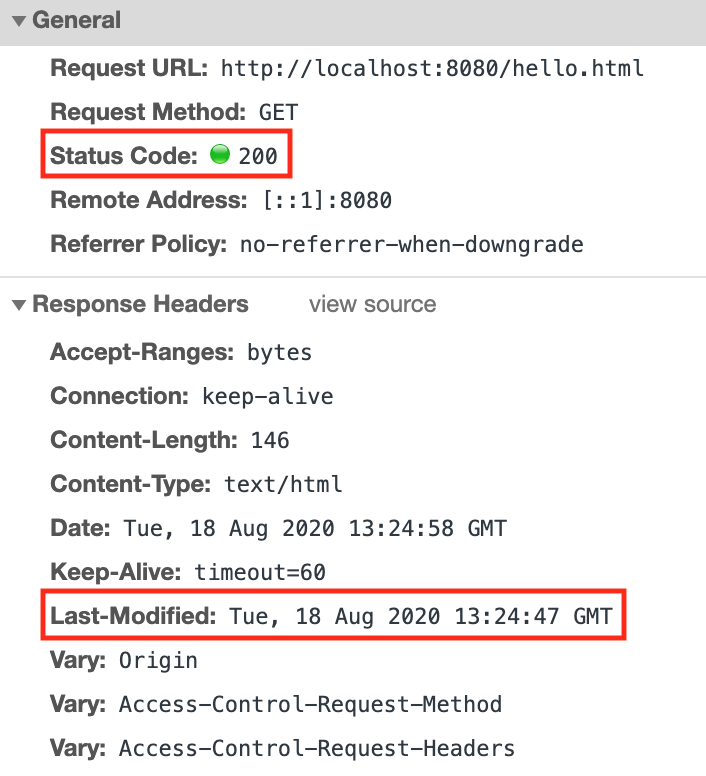

브라우저는 저장하고 있던 hello.html 리소스의 modified date를 If-Modified-Since에 담아 보내고 서버는 hello.html이 그 보다 나중에 수정되었으므로 200 응답 코드로 리소스를 다시 보낸다.
References
출처 : atoz-develop.tistory.com/entry/spring-boot-web-mvc-static-resources?category=869242
'Spring Framework > Spring boot #3' 카테고리의 다른 글
| 스프링 부트 2.0의 default DBCP, hikariCP가 그렇게 빠르다던데? (hikariCP 저만의 성능 테스트를 해봤습니다.) (0) | 2023.04.26 |
|---|---|
| @Valid 와 validation을 이용한 중복체크 및 유효성 검사 (0) | 2022.05.24 |
| [Spring Boot] 문자인증 구현 coolSMS (0) | 2022.05.24 |
| 스프링 부트에서 즉시 웹 개발을 시작할 수 있는 이유 - AutoConfiguration (0) | 2021.04.22 |
| Spring Boot + MyBatis 설정 방법(HikariCP, H2) (0) | 2021.04.22 |
| [Spring Boot/Spring Web MVC] ViewController를 이용해서 뷰 매핑하기 (0) | 2021.04.22 |
| [Spring Boot] ApplicationRunner 등록 방법 정리 (0) | 2021.04.22 |
| 스프링 부트 테스트 - 내장 서버 랜덤 포트로 띄우기 (0) | 2021.04.22 |